
Managing dependencies in Python projects is essential for consistency across environments. Pip Install Requirements.txt allows developers to install all necessary packages listed in a requirements.txt file with a single command.
This simplifies collaboration, deployment, and maintenance by ensuring every setup has the same dependencies, reducing compatibility issues.
In this guide, we’ll explore how to pip install requirements.txt and simplify dependency management for your Python projects, ensuring smooth collaboration and deployment across environments.
What is Pip Install Requirements.txt?
A requirements.txt file is a text file containing a list of all the Python packages and their specific versions that your project depends on.
By using pip install requirements.txt, you can easily install all the dependencies listed in the file, ensuring your project environment is consistent and error-free.
This ensures that your development environment matches the project’s requirements, which is especially helpful when working in teams or deploying applications to production.
The Importance of Using Requirements.txt
Without a requirements.txt file, you’ll have to manually install each dependency for your Python project using pip, which can be time-consuming and error-prone.
This can be time-consuming and error-prone, especially when you have several libraries to install. With the requirements.txt file, you can automate this process and ensure consistency across different environments.
For example, when you share your code with others, they can simply use pip install requirements.txt to install all the necessary packages, ensuring that your project runs as expected.
This is also helpful when deploying your project to a server, as you don’t have to worry about missing dependencies or configuration issues by using pip install requirements.txt.
How to Create a Requirements.txt File
Before you can use pip install requirements.txt, you need to create the requirements.txt file. Fortunately, this is a straightforward process.
Using pip freeze to Generate the File
If you’ve already installed the dependencies for your project manually, you can generate a requirements.txt file with pip. The command is as follows:

This command will take all of the installed packages in your current Python environment and save them to a requirements.txt file. It will include the package names along with the versions that were installed.
Manually Creating the File
Alternatively, you can manually create a requirements.txt file by listing each package and its version in the format:

For example:

You can also specify version ranges using operators such as >=, <=, >, and < for more flexibility in managing versions. For example:

How to Use Pip Install with Requirements.txt
Once you have your requirements.txt file ready, you’re just one step away from easily installing all your dependencies. To install the dependencies listed in the file, run the following command:
bashCopy codepip install -r requirements.txt
Steps to Install Dependencies Using Pip Install
- Navigate to your project directory: Make sure you’re in the directory where your
requirements.txtfile is located.

- Install the dependencies: Run the command to install all the required packages.

Pip will read the requirements.txt file, fetch the specified versions of each package from the Python Package Index (PyPI), and install them in your environment.
- Verify the installation: Once the installation is complete, you can check that the packages were successfully installed by running:

This command will display a list of all installed packages in your current environment. If everything was installed correctly, you should see the packages from your requirements.txt file listed here.
Best Practices When Using Pip Install Requirements.txt
To make the most out of pip install requirements.txt, consider the following best practices:
Use Virtual Environments
It’s a good idea to install your dependencies in a virtual environment to avoid conflicts with other projects or system-wide packages.
A virtual environment isolates your project’s dependencies, ensuring that they don’t interfere with other Python projects.
You can create a virtual environment using the following command:

Activate the virtual environment:
- On Windows:

- On macOS/Linux:

Once the virtual environment is activated, you can proceed to install the dependencies from your requirements.txt file.
Locking Package Versions
It’s important to specify exact versions of your packages in the requirements.txt file, especially for production projects. This prevents issues arising from incompatible updates to packages.
Using pip freeze will help lock the versions of the packages currently installed in your environment. However, you should also be cautious about including too many dependencies that your project doesn’t need, as this can lead to unnecessary bloat.
Regularly Update Your Dependencies
While it’s important to lock package versions, you should also regularly update your dependencies to ensure you’re using the latest stable versions. You can update all the packages in your requirements.txt file with:

To avoid security vulnerabilities, ensure you’re using the latest versions of libraries with critical security patches.
Include a Comment in Your Requirements.txt File
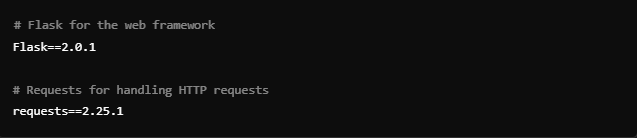
If you have specific instructions or notes about certain packages, it’s a good practice to include comments in your requirements.txt file. Comments can be added by prefixing a line with the # symbol.
For example:
Troubleshooting Common Issues

Incompatible Versions
Sometimes, installing dependencies using pip install requirements.txt can lead to version conflicts, where one package requires a different version of another package than what’s already installed. To resolve this, you can either:
- Specify a compatible version range in your
requirements.txtfile. - Update or downgrade a particular package.
You can also use tools like pipdeptree to visualize the dependency tree and identify any conflicts.
Missing Packages
If you try to install packages from requirements.txt but encounter errors about missing packages, make sure your virtual environment is active.
Sometimes, pip may fail to recognize your active environment, especially if you have multiple Python installations.
Check the Python version being used by pip with:

Conclusion
Managing project dependencies has never been easier than with pip install requirements.txt. By creating a requirements.txt file and using pip to install all the necessary packages, you can ensure that your Python projects are reproducible and easy to maintain.
Whether you’re working on a personal project or collaborating with a team, this simple approach to dependency management will save you time and avoid unnecessary errors.
FAQs
What is a requirements.txt file?
A requirements.txt file lists all the Python packages and their versions needed for a project to ensure consistency.
How do I create a requirements.txt file?
Run pip freeze > requirements.txt or manually list dependencies in the file using package_name==version_number.
How do I install dependencies from a requirements.txt file?
Use pip install -r requirements.txt to install all packages listed in the file.
Why should I use a requirements.txt file?
It ensures a consistent environment, simplifies collaboration, and automates dependency installation.
Can I use a virtual environment with requirements.txt?
Yes, create one with python -m venv venv, activate it, and install dependencies using pip install -r requirements.txt.
How do I update packages in requirements.txt?
Run pip install --upgrade -r requirements.txt to update all packages to their latest versions.
How do I resolve dependency conflicts in requirements.txt?
Use pipdeptree to check conflicts and adjust package versions manually in requirements.txt.
Can I add comments to a requirements.txt file?
Yes, use # to add comments, e.g., # Required for web development before listing a package.